Shower Drainage Systems: Water in, Water out vs Sealed System
If you are in the market for a new shower, you are probably thinking about things like material selection, design and style, budget, maintenance, and making sure your shower is built to last. Of the many factors that contribute to the success of a shower installation, the most important ones revolve around water. How is it delivered? How is it contained within the designated space? How is it carried away? Water exits your shower in one of two ways: a water in, water out drainage system or a fully waterproofed drainage system. This article takes an honest look at the pros and cons of each type of system. Read on so that you can make an informed decision about your installation.
First, let’s look at each system.
See the Difference Between a Traditional and a Fully Waterproofed System
Schluter Systems created an excellent, informative video to demonstrate the difference between the two types of shower drainage systems. Keep in mind, however, that this is an educational video created for an audience of professional craftspeople. (When Schluter Systems says they make shower installation “easier than ever,” they are not speaking to the average homeowner who knows very little about tile installation.)
Two Basic Types of Shower Drainage Systems
The use of water drainage systems and waterproofing materials can be traced back to the ancient aqueducts of Greece and bathhouses of Rome. Eventually, people decided bathing should be a private matter and incorporated bathrooms into their homes. The first home shower drainage systems were extremely simple. A concrete base sloped toward a drain. These systems were also problematic. Dissatisfied with cracks, leaks, and drainage issues, people finally came up with a better solution in the 1920s.
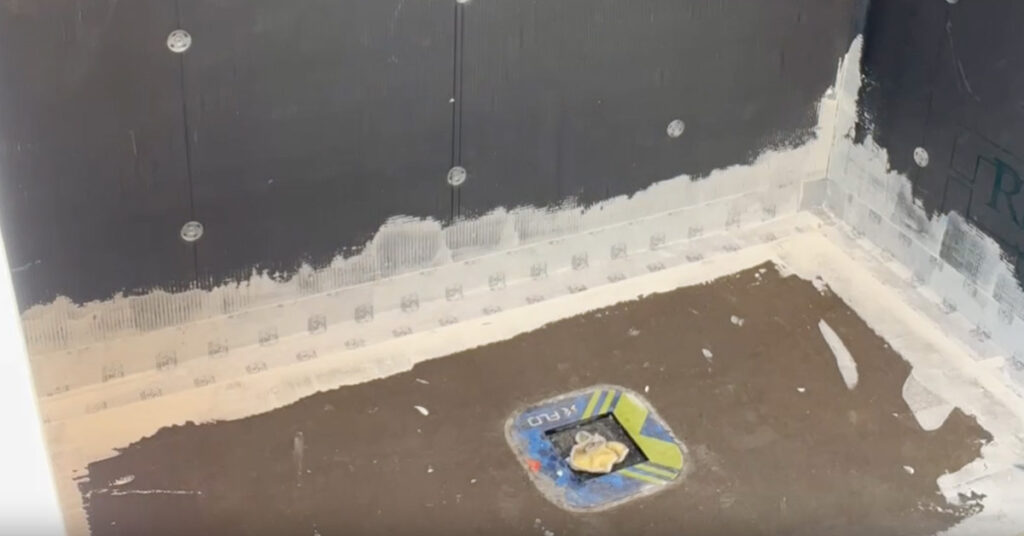
Traditional System (Water in, Water out)
Traditional water in, water out shower systems using a pan liner remain popular to this day. Adam Copher, owner of Copher Tile & Stone, dives into the details of this system:
A water in, water out system starts with a clamping ring drain, also known as a 2-stage drain. A pre-slope is installed to be flush with the bottom flange of the drain. This is typically made from a mortar bed. Then a waterproof liner is installed on top of the slope. After that, a second mortar bed is installed on top of the liner to the top of the drain and pitched to allow water to drain. A vapor barrier is installed on the walls prior to preparing the walls with a mud float or cement board.
Adam Copher
Many DIY enthusiasts assume that tile is waterproof. They rely on tile alone to prevent water damage. This is a costly mistake that results in the need for renovations. Certain types of natural stone, ceramic tiles, and grout are very porous. In fact, under a microscope these materials resemble a sponge. One might imagine that tiles made of very dense (low porosity) natural stone or highly water-resistant materials like porcelain or glass would be waterproof. But water inevitably finds its way into and under surface materials.
Copher points out, “Because tile and grout are not waterproof, this system is designed to allow water to pass through the mortar bed and direct the water to the weep holes at the base of the drain directly above the shower pan liner.”
Fully Waterproofed System (Sealed System)
Throughout the 1900s, the industry saw innovations in waterproofing materials. This eventually resulted in the adoption of fully waterproofed shower drainage systems.
A sealed system utilizes a different style drain known as a bonding flange. These drains do not have weep holes. Instead of having a mortar bed directly under the tile, the waterproofing is directly under the tile. This waterproofing extends all the way up the walls to the top of the tile assembly.”
Adam Copher
A Closer Look at the Traditional System (Water in, Water out)
The functionality and durability of traditional shower drainage systems that use the water in, water out method have stood the test of time. Copher says, “Modern marketing and poor execution from installers have given this method a bad reputation, but executed properly this system is perfectly acceptable and should last many years.”
Installing a traditional system is not an easy task. Even with all the right tools and materials and very detailed instructions, an inexperienced installer can make costly mistakes.
Some of the things installers get wrong with this system are not using a vapor barrier on the walls, embedding fiber cement backer-boards in the mud bed which allows water to wick up the walls, using a shower pan liner on curbless showers which is not an approved method and prone to problems (see 7 Reasons to Choose a Curbless Shower), and penetrating the pan liner with screws or nails when attaching cement boards or metal lath to the walls or curb (see 3 Reasons to Fire Your Tile Contractor Today).”
Adam Copher
Let’s take a closer look at why it is so important for shower walls to stay dry.
Why Shower Walls Need to Stay Dry
Imagine surface material that keeps water from entering in liquid form. Is it waterproof? Not necessarily. Water vapor in the form of humidity or steam can still get through the tile and grout lines. Moisture absorption takes place in environments with these two features: unregulated humidity and temperature fluctuations. Showers have plenty of both. Trapped vapor can then turn into a liquid. The only way for it to escape is to evaporate. If there is no vapor barrier, it can easily evaporate into the shower studs and surrounding building materials. This results in mold or an unsightly, white substance called efflorescence. A vapor barrier can reduce the rate of moisture movement through building materials to inhibit or prevent these problems.
As Copher mentioned, with improper installation, water wicks up the walls of a shower from the mud bed. If your tile is natural stone containing iron, the iron can oxidize. That is a fancy way of saying your stone can rust and become discolored. The stone may also flake, become pitted with small holes, or come apart in layers (spalling). If you have porcelain, ceramic, or glass tiles, you may only notice problems with the grout lines. Eventually, the integrity of the bonding materials will be compromised and things will start falling apart.
How can these problems be avoided? Proper installation is key when it comes to traditional water in, water out shower drainage systems.
Pros and Cons of the Traditional System (Water in, Water out)
Copher explains the pros and cons of the traditional water in, water out system:
Pros: This system uses less expensive materials, works well, and has stood the test of time. Natural stone like Carrara Marble performs well with this type of system as long as the stone is not sealed. This system is very conducive to using a mortar bed to float the walls, which is one of the best ways to achieve plumb, flat, square walls.
Cons: This is a labor-intensive system. It is frequently installed improperly. Weep holes can clog as the system ages resulting in a waterlogged mortar bed and possible leaks due to a lack of drainage. Shower pan liners are not approved for curbless showers. It does not come with any manufacturer warranty.
Adam Copher
TIP: Here is a solution for clogged weep holes. Remove the drain cover. Find the weep holes around the main pipe. Use something small enough to fit into the hole to clean out mineral deposits and contaminants. A pipe cleaner works well for this task. Replace the drain cover.
A Closer Look at the Fully Waterproofed System (Sealed System)
A fully waterproof system is easier to install, which dramatically reduces total installation time. If you only have one bathroom in your home, this reason alone might motivate you to choose a sealed system. With proper installation, the risk of a shower failure due to water or vapor penetration with a fully waterproofed system is very minimal.
Since the waterproofing extends all the way up the walls to the top of the tile assembly, this removes a lot of the opportunities for installers to install improperly, especially the outside corners in the shower pan. However, it is important that the installer is meticulous about following the manufacturer’s instructions to prevent problems.
Adam Copher
Pros and Cons of the Fully Waterproofed System (Sealed System)
Copher explains the pros and cons of the fully waterproofed, sealed system:
Pros: There are less problems associated with installer error. Manufacturer warranties are available. This system is suitable for curbless showers. There are no weep holes. Many of these systems are suitable for steam showers. Benches, half walls, and niches are fully waterproofed as part of the system.
Cons: The materials are more expensive. With certain types of surface materials, it can be tricky to install all the waterproofing properly while adhering to proper cure times. For certain fully waterproof systems, the framing may need to be fixed to ensure flat, plumb and square walls. The layers of waterproofing can cause buildup resulting in a more difficult installation and/or walls that are less flat.
Adam Copher
Lighter colored natural stone has a tendency to show moisture discoloration, even with a properly installed, fully waterproof system. The discoloration disappears as soon as the stone dries out. The problem is that people use their showers almost every day, so the stone never has a chance to dry out. Copher describes his solution:
Natural stone like Carrera may need to be pre-sealed, installed with epoxy mortar, and grouted with epoxy to prevent blotchy, wet-looking areas from appearing after the shower is put into use.
Adam Copher
Your General Contractor May Not Understand How to Get the Best Results
In San Luis Obispo County and California in general, tile installers are accustomed to doing what they call “mud work,” that is, they employ the traditional method of mixing sand, cement, and water to create a base for tile.
We know how to float walls and floors with mortar beds that are flat, plumb, level, square and feel rock solid.
Adam Copher
The use of foam backer boards in shower installations has become increasingly popular because of advantages like ease of installation and reduced drying time, but it has also created a situation that requires a high level of cooperation between tile installers and general contractors. Here is why. Suppose a general contractor installs backer boards and tells the installer to come in and waterproof everything and install tile, but the framing is not quite right for tile installation.
Copher describes four ways installers usually handle a situation like this. Only two of them comply with industry standards. Readers can probably guess which two ways are not advisable:
- “Fix” inconsistencies with the subfloor or walls with thinset during tile installation, even though this is not the way thinset is designed to be used and can result in failures of the tile installation
- “Follow the walls” even though the tile layout will look uncentered and imbalanced
- Fix the framing prior to hanging backer board
- Utilize a mud bed prior to waterproofing
Copher Tile & Stone has built a strong reputation in San Luis Obispo County for delivering the best possible results. Copher spells out his expectations:
When we are using a sealed system, I typically ask the builder not to install any backer boards. We will then come in and spend a day fixing the framing. Another approach is to have the builder go ahead and install a gypsum backer board, and then we will come in and float the walls with a mortar bed before waterproofing. This is a little more time consuming and costly, but results in the best outcome.
Adam Copher
Copher Tile & Stone proudly stays up to date on tile installation technologies with ongoing education with Mapei Technical Institute, Ardex Academy, the National Tile Contractors Association, Laticrete, and Schluter. Copher is a Certified Tile Installer (#1644).
by Alice Dean
