
Chances are when you hire a tile contractor you are making a significant investment into the beauty and functionality of your home. When tile is installed correctly it should last a very long time. Improper tile installation can be heartbreaking and expensive to fix. Let’s take a look at three major mistakes that we see from time to time that end up costing homeowners a lot of money and heartache. If you see these things happening on your job, you probably should fire your contractor and find a new one.
Your tile contractor is installing tile directly to green board in your shower.
NOPE! You can’t fire this contractor fast enough! Green board or regular drywall will not hold up in a shower.
Some less-than-reputable contractors might argue, “But isn’t green board moisture resistant?”
It is moisture resistant but cannot withstand the amount of moisture that a shower will produce. It’s only a matter of time before the green board or drywall becomes saturated, moldy, and falls apart. Oftentimes, before you realize there is a problem, the moisture will have already made it into your framing and caused serious damage.
If your tile installer is using green board and then attaching a sheet membrane such as Kerdi Membrane to waterproof your shower, that is an acceptable method. We don’t prefer this method, but the manufacturer of Kerdi Membrane will warranty the membrane when properly installed over green board in a shower. Here in San Luis Obispo County, it does not meet code to put green board in your shower even if it is covered with Kerdi membrane. The inspectors will want to see a coated, glass-mat, water-resistant gypsum backer, such as DensSheild, instead of green board.
Your tile installer has installed nails, screws or staples below the top of the shower dam.
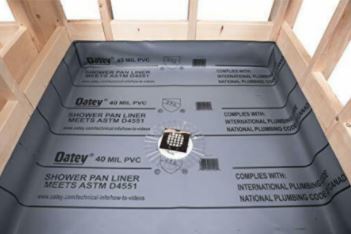
If your tile installer is using a chloraloy or PVC shower pan liner, it is a requirement that there are no penetrations below 3” from the top of the shower dam.
Oftentimes installers who use cement backer boards such as Hardie Backer, Wonder Board, Durock, or Permabase, will install the board down to the floor or near the floor and use screws or nails that penetrate into the shower liner. This is a big problem and can result in a leaky shower and serious damage to the structure.
Also, when using a shower pan liner, the installer MUST NOT use cement backer board to wrap the shower dam. There is no way to properly fasten the cement backer board without damaging the shower pan liner and causing a leak. The proper way to prepare the shower dam is to wrap the dam with lath and only fasten it to the outside vertical side of the dam. No fasteners on top or inside the dam. Then the dam is floated with mortar.
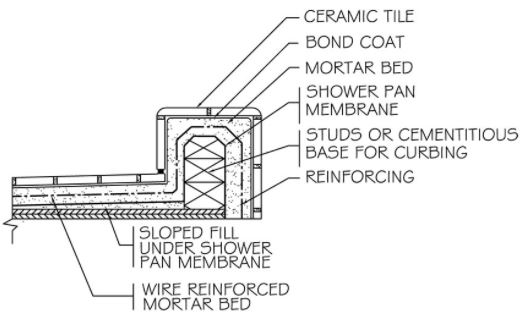
In the event that your installer is using a different type of waterproofing for the shower pan, there are occasions when using backer board on the shower dam or using fasteners down below the dam is acceptable. Namely, when the walls and shower pan are waterproofed continuously on the surface using a roll-on type waterproofing or sheet membrane type waterproofing that is properly tied into the drain. The waterproofing must tie into the clamping ring of a traditional three-piece drain or into an integrated bonding flange like a Kerdi Drain.
Your tile installer is spot bonding.
This one is going to ruffle some feathers. The above reasons to fire a tile installer are pretty basic, and if you see these types of mistakes, it shows that your installer was never properly trained and will most likely not even be equipped enough to give you an installation that even looks good on the outside. Here in California, there are a lot of tile installers that were taught to spot bond who would otherwise do a decent job for you.
What is spot bonding, you ask? Spot bonding is when the installer puts blobs of mortar on the tile or on the floor/wall to adhere to the tile. Sometimes the installer will use a notch trowel to comb the floor or wall first and then add some blobs. Sometimes they will use the flat side of the trowel to skim or “burn the mortar in” first and then add some blobs. Sometimes they only use blobs and omit the notch trowel altogether.
Why do installers do this? This technique makes it easier to install the tile flat. When the floor or wall isn’t flat enough before installation begins, the tile installer ends up trying to compensate by “building up” the tile with mortar. Spot bonding saves time and money in substrate preparation and makes it easy to install the tile super flat. This sounds great, right? What could go wrong? Spot bonding is one of the top reasons for failed tile installations.
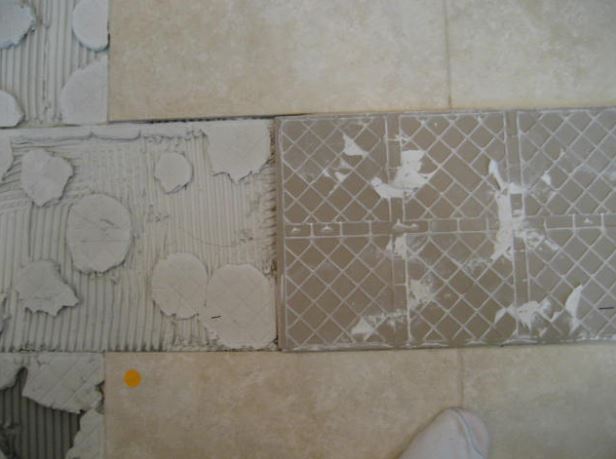
As you can see in the picture, spot bonding leaves large voids under the tile. The installer probably thought that they had great thinset contact with the tile. These large voids result in hollow sounding tiles and can result in cracks from any kind of point load, like rolling a refrigerator across the floor. Even someone in high heels can crack the floor tiles. Spot bonding also doesn’t allow for the same kind of shear strength that a properly embedded tile has. So, if there is any structural movement, the tile will be more prone to coming loose. Also, in a wet area these excessive voids become an area where water can accumulate. This can cause discolored grout, and if natural stone is, used spot bonding may result in permanently discolored stone.
If you would like to learn more about proper troweling techniques, check out this video.
Hiring a reputable tile installation contractor who understands and adheres to industry standards is a great way to protect your investment and enjoy your new tile installation for many years or even decades to come.
